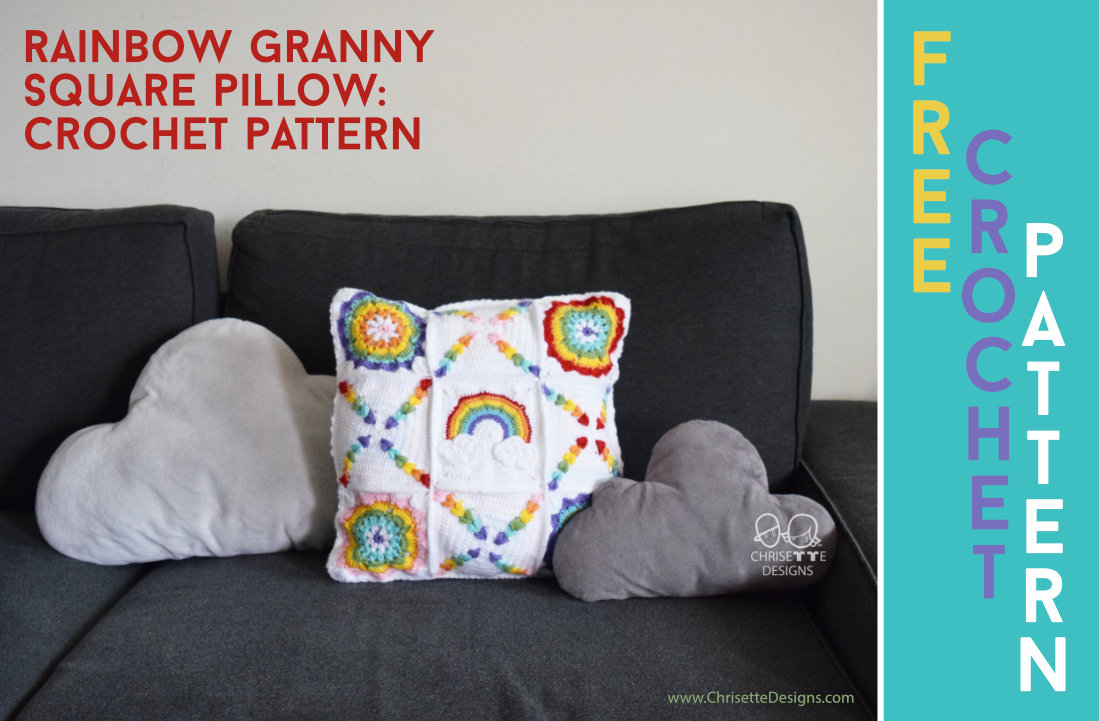
This Rainbow Granny Square Pillow pattern is a combination of multiple patterns and then some additions by me!
PIN this for later!
This was a gift I made for a friend who is an awesome crocheter and you should check out her stuff HERE! She showed me a picture of something similar and with lots of deep dives on google, I was able to piece this together!
Alright here we go! Watch me get straight to the point! BAM!
PATTERN
NOTE: This is a combination of patterns from other designers and some additions by me.
This pattern is NOT to be SOLD .
You may sell what you make, but must use your own photos and should credit me and the other designers by showing the link to my pattern here.
If you need assistance or find a site selling my pattern, please feel free to contact me at chrisettedesigns@yahoo.com Enjoy!
MATERIALS:
1. 3.25 mm & 5.5 mm crochet hook.
2. Medium weight size 4 yarn.
3. Bent Yarn needle.
4. Stitch marker.
STITCHES: (U.S. Terms)
mc: main color
MR: Magic ring. Tutorial below:
dc: double crochet.
sc: single crochet.
hdc: half double crochet.
inc: increase. 2 sc sts into the same st.
dec: invisible decrease, crochet 2 sc together.
DCdec: double crochet decrease.
HDCdec: half double crochet decrease.
Here is a video tutorial of the invisible decrease, which looks much better than a regular decrease that leaves bigger holes in between stitches. The video shows with single crochet, but it’s similar to the double crochet decrease.
st(s): stitch(es)
ch: chain
sp: space
sl st: slip stitch
sk: skip
blo: back loop only.
tr: triple crochet.
dtr: double triple crochet.
DTRdec: double triple crochet decrease.
NOTES:
1. This may require blocking afterward for the squares to even out.
2. I used a 3.25 mm hook, but that is based on the yarn I used and my tension when crocheting. You may need to adjust your hook size if your tension is tighter or looser than mine. This will affect how big your squares turn out. My goal was an 18 x 18 inch pillow.
3. The finished size fits an 18 x 18 inch pillow form. They come in many sizes so no worries if yours is larger or smaller!
4. Do not count beginning chains.
5. I consider myself a novice to granny squares, so I am 100% aware that the rainbow square is not perfect at all! But it worked for me and I was happy with the outcome 🙂
5. Know how to color change your yarn. Here is a video showing how:
STEP 1:
With a 3.25 mm hook, make 4 of this “X” design square following the pattern by CraftyCC HERE
I varied the color changes on each one to mix it up.

STEP 2:
With a 3.25 mm hook, make 4 of this floral design square following the pattern by Crochet Millan HERE (Scroll down until you see the diagram.) The white part of this square is in step 3 below.
I varied the color changes on each one to mix it up.
NOTE: You will need to be able to read crochet symbols. Click HERE for a symbol guide. My modifications are under the next photo.

Here are my modifications to it:
Row 3: Do double crochets instead of triple crochets. 2 stitches in each cluster instead of 3.
Row 4: Do half double crochets instead of double crochets.
Row 6: Single crochets instead of double crochets.
STEP 3:
With a 3.25 mm hook, do the white part of this square by following the pattern by Cypress Textiles HERE
STEP 4:
Rainbow Square:
Make 1 with a 3.25 mm hook. This is made in continuous rounds, use a stitch marker. Carry your yarn through as you color change.

Row 1: *With mc* MR, ch 2. 12 dc. (12 sts).
Row 2: (inc) x 12. (24 sts). *these are sc, see “stitches” section above.*
Row 3: 24 sc. (24).
*Color change to purple*
Row 4: (sc, inc) x 7. *Change to mc.* (sc, inc) x 5. (36 sts).
*Color change to blue.*
Row 5: blo. (2 sc, inc) x 7. *Change to mc.* Both loops. (2 sc, inc) x 5. (48 sts).
*Color change to green.*
Row 6: blo. (3 sc, inc) x 7. *Change to mc.* Both loops. (3 sc, inc) x 5. (60 sts).
*Color change to yellow.*
Row 7: blo. (4 sc, inc) x 7. *Change to mc.* Both loops. (4 sc, inc) x 5. (72 sts).
*Color change to orange.*
Row 8: blo. (5 sc, inc) x 7. *Change to mc.* Both loops. (5 sc, inc) x 5. (84 sts).
*Color change to red.*
Row 9: blo. (6 sc, inc) x 7. *Change to mc.* Both loops. 35 sc to the end. (91 sts).
Fasten off.
NOTE: Don’t worry if it is a little uneven looking. Blocking really helps to straighten things out! Here are some before and after pictures:

Before blocking 
Pinned down on blocking mat 
After blocking 
Before on the right, after on the left
Reattach your main color into the 14th st of the rainbow on the right side.

1st side of square: All in the same stitch, (Ch 6, 3 dtr).

Sk 2 sts. 2 tr.
(DCdec) x 3.
dc.
4 hdc. HDCdec. 4 hdc.
DCdec
dc.
(DCdec) x 2.
All in the next stitch, (3 dtr, ch 3, 3 dtr).

Does it look wonky? YES! But did it matter in the end after blocking? Nope! I also crochet very tight since I usually make dolls.
2nd side: Repeat for 3rd side as well.
Sk 2 sts. 2 tr.
(DCdec) x 2.
6 hdc.
(DTRdec) x 2.
sk 2 sts
All in the next stitch, (3 dtr, Ch 3, 3 dtr).


4th side:
Sk 2 sts. 2 tr.
(DCdec) x 2.
6 hdc.
(DTRdec) x 2.
sk 1 st.
Back to beginning corner. 2 dtr in same st as the beginning corner. Join with a slip stitch to 3rd chain in Ch 6 loop.

LAST ROW:
Ch 3. All in the same ch 3 sp, (dc, ch 2, 2 dc).
(dc, DCdec) x 8.
[All in the same ch 3 sp, (2dc. ch 2. 2 dc). 18 dc.] x 3.
Dc into the first corner ch space. Sl st into the 3rd ch of the first ch 3 of this row.
Fasten off and weave in the ends.

Clouds: Make 2 with a 3.25 mm hook. Follow this pattern by Pattern Paradise HERE
I did “Cloud #1 – 5 Puffs”.

Attach each cloud to cover the bottom edge of the rainbow.
STEP 5:
Layout all 9 squares and join. There are tons of different ways to join granny squares, but I chose one that wouldn’t add too much more width to the final pillow since it was already close to the 18 inches I wanted. Here is a link to the single crochet join method I used HERE
STEP 6:
Back of pillow: 5.5 mm hook. Ch the length needed, and dc across starting with the 3rd ch from the hook. Ch 2 at the beginning of each row.
I did 51 dc across, 27 rows.
You can find pillow forms in most craft stores that sell fabric.

Sew 3 sides of the pillow closed with sl sts or sc, depending how you’d like the pillows edge to look. Insert the pillow and close up the 4th side.
ALL DONE!
If you liked this pattern, please support me on Ko-Fi!
Please use the hashtag #chrisetteDesigns if you share your pillow on social media so I can share yours on my page! 🙂 Be sure to tag me too!
Instagram
Facebook
Twitter
I hope this pillow will bring some brightness to your room!


 Subscribe for a FREE baby set pattern & updates! (All the cool kids are doing it.)
1 thought on “Rainbow Granny Square Pillow: Free Crochet Pattern”