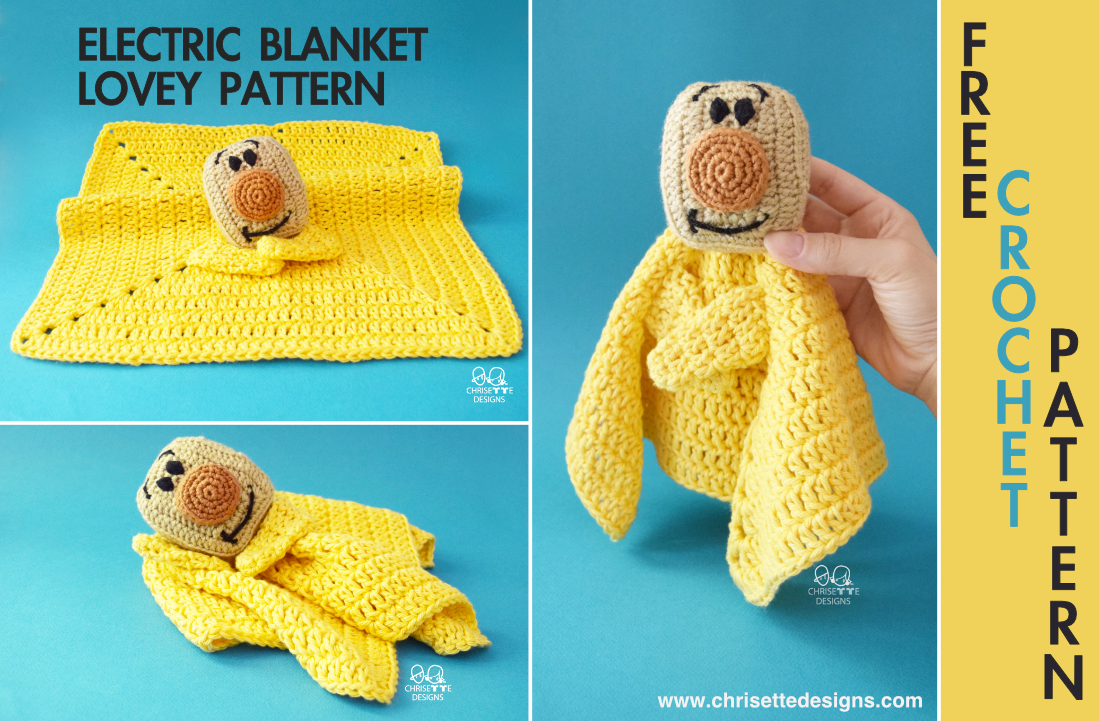
Remember Blanky from “The Brave Little Toaster”?
You can make him with this free crochet lovey pattern!
My friend asked me to make one for a baby in her family and I gladly took up the challenge!
Making this was so nostalgic for me, here’s one of my favorite clips:
I decided to make him as a small lovey instead of a full blanket so he could be easily carried around.
PIN THIS FOR LATER!

Are you a beginner crocheter?
The full video pattern can be found on my YouTube channel here:
PATTERN
If you need assistance or find a site selling my pattern, please feel free to contact me at chrisettedesigns@yahoo.com Enjoy!
FINISHED SIZE:
About 13.5 inches (34.29 cm).
MATERIALS:
1. Medium weight size 4 yarn (Yellow 150 yds, beige, brown and black). I used cotton yarn for the body and nose, and acrylic yarn for the head.
2. 5 mm crochet hook for the body, 3.25 mm for the head.
3. Stitch markers.
4. Bent Yarn needle.
5. Polyfil for the head and nose.
STITCHES: (U.S. Terms)
Magic ring: Tutorial below:
st(s): stitch(es).
ch: chain.
dc: double crochet.
hdc: half double crochet.
sc: single crochet.
sl st: slip stitch.
sp: space.
blo: back loop only. Here is a video tutorial showing how:
NOTES:
1. The head is worked in continuous rounds. The yellow blanket is worked in rows.
2. Do not count chs. Count sl sts.
3. Check your gauge for the blanket section and change your hook size if necessary. If you have never checked your gauge before, check out this blogpost by Ravin Sekai designs:
https://www.ravinsdesigns.com/home/why-do-we-use-gauge
4. Pay attention to all text on photos.
GAUGE: For the blanket body. 5 mm hook.
Ch18. Starting in the 3rd ch from the hook, 16 dc.
Ch2, turn, 16 dc. Repeat for 8 rows.
Block this swatch so you will know how much the blanket will stretch after washing. Adjust your hook if necessary to meet gauge.
4” x 4” (10 cm) = 14 dc across x 7 rows.


BLANKET: 5 mm hook, yellow yarn.
Start with a slip knot with a long tail end, this will be used later to sew the head onto the blanket.

Ch 6, join with a sl st to form a ring.


Row 1: Working in the ring: ch 3 (counts as DC)…

2 dc.

(ch 2, 3 dc) x 3.


Don’t crochet over that beginning tail end! Let it hang out so you can use it later to sew the head on.

This is after doing the 3 repeats.

Ch2. Join with a sl st to top of ch 3. (12 dc sts, 4 ch2 spaces).

Row 2: Ch 3 (counts as a dc), dc in the next 2 sts to the first ch2 sp.

*[2 dc, ch2, 2 dc] in the ch2 sp (corner made).

dc in each st to the next ch2 sp (3 dc).*

Repeat from * to * 3 times.


Join with a sl st to top of the ch3. (28 dc sts and 4 corner ch2 spaces).

Row 3: Ch3 (counts as dc), dc in each st to first ch2 sp (4 dc), *[2 dc, ch2, 2 dc] in ch2 sp (corner made), dc in each st to next ch2 sp (7 dc)**; rep from * to ** 3 times, [2 dc, ch2, 2 dc] in ch2 sp (corner made), dc in each st to beginning (2 dc). Join with a sl st to top of ch 3. (44 dc sts and 4 corner ch2 spaces).
Row 4: Ch3 (counts as dc), dc in each st to first ch2 sp (6 dc), *[2 dc, ch2, 2 dc] in ch2 sp (corner made), dc in each st to next ch2 sp (11 dc)**; rep from * to ** 3 times, [2 dc, ch2, 2 dc] in ch2 sp (corner made), dc in each st to beginning (4 dc). Join with a sl st to top of ch 3. (60 dc sts and 4 corner ch2 spaces).
Row 5: Ch3 (counts as dc), dc in each st to first ch2 sp (8 dc), *[2 dc, ch2, 2 dc] in ch2 sp (corner made), dc in each st to next ch2 sp (15 dc)**; rep from * to ** 3 times, [2 dc, ch2, 2 dc] in ch2 sp (corner made), dc in each st to beginning (6 dc). Join with a sl st to top of ch 3. (76 dc sts and 4 corner ch2 spaces).
Row 6: Ch3 (counts as dc), dc in each st to first ch2 sp (10 dc), *[2 dc, ch2, 2 dc] in ch2 sp (corner made), dc in each st to next ch2 sp (19 dc)**; rep from * to ** 3 times, [2 dc, ch2, 2 dc] in ch2 sp (corner made), dc in each st to beginning (8 dc). Join with a sl st to top of ch 3. (92 dc sts and 4 corner ch2 spaces).
Row 7: Ch 3 (counts as dc), dc in each st to first ch2 sp (12 dc), *[2 dc, ch2, 2 dc] in ch2 sp (corner made), dc in each st to next ch2 sp (23 dc)**; rep from * to ** 3 times, [2 dc, ch2, 2 dc] in ch2 sp (corner made), dc in each st to beginning (10 dc). Join with a sl st to top of ch 3. (98 dc sts and 4 corner ch2 spaces).
Row 8: Ch 3 (counts as dc), dc in each st to first ch2 space (14 dc), *[2 dc, ch2, 2 dc] in ch2 sp (corner made), dc in each st to next ch2 sp (27 dc)**; rep from * to ** 3 times, [2 dc, ch2, 2 dc] in ch2 sp (corner made), dc in each st to beginning (12 dc). Join with a sl st to top of ch 3. (114 dc sts and 4 corner ch2 spaces).
Row 9: Ch 3 (counts as dc), dc in each st to first ch2 sp (16 dc), *[2 dc, ch2, 2 dc] in ch2 sp (corner made), dc in each st to next ch2 sp (31 dc)**; rep from * to ** 3 times, [2 dc, ch2, 2 dc] in ch2 sp (corner made), dc in each st to beginning (14 dc). Join with a sl st to top of ch 3. (140 dc sts and 4 corner ch2 spaces).
Row 10: Ch 3 (counts as dc), dc in each st to first ch2 space (18 dc), *[2 dc, ch2, 2 dc] in ch2 sp (corner made), dc in each st to next ch2 sp (35 dc)**; rep from * to ** 3 times, [2 dc, ch2, 2 dc] in ch2 sp (corner made), dc in each st to beginning (16 dc). Join with a sl st to top of ch 3. (156 dc sts and 4 corner ch2 spaces).
Row 11: Ch 3 (counts as dc), dc in each st to first ch2 sp (20 dc), *[2 dc, ch2, 2 dc] in ch2 sp (corner made), dc in each st to next ch2 sp (39 dc)**; rep from * to ** 3 times, [2 dc, ch2, 2 dc] in ch2 sp (corner made), dc in each st to beginning (18 dc). Join with a sl st to top of ch 3. (172 dc sts and 4 corner ch2 spaces).
Fasten off, weave in the end.
ARMS: 5 mm hook, make 2.
Rnd 1: MR, ch2, 6 dc. (6 sts).
Rnd 2: Sl st to the first st, ch2, (2 dc, 2 dc in the next st) x 2. (8 sts).
Rnd 3: Sl st to the first st, ch2, 8 sc. (8 sts).
Rnd 4: Sl st to the first st, ch2, (3 dc, 2 dc in the next st) x 2. (10 sts).
Rnd 5: Sl st to the first st, ch2, (4 dc, 2 dc in the next st) x 2. (12 sts).
Sl st to the first st.
Fasten off with a long tail to sew it onto the body.
Sew through the outside loops of the opening of the arm.
Cover the 8th and 9th hole on the blanket from the corner with the arm.

HEAD: 3.25 mm hook, stitch markers, beige yarn.
NOTE: I put a st marker in each ch1, this is optional of course.
Do not count chs in the final st count of each row.
For the entire head, DO YOUR ch1’s LOOSE SINCE YOU WILL NEED TO DO INCREASES INTO THEM!!
Rnd 1: Ch7. (Ignore that the photo is only showing 6 chs. Do 7!)

Starting in the second ch from the hook, 5 sc.

(2 sc, ch1, 2 sc, ch1, 2 sc) all in the last st.

Working on the opposite side of the starting ch, 5 sc.
(2 sc, ch1, 2 sc, ch1, 2 sc) all in the last stitch.

Sl st on top of the first sc. (22 sts).

NOTE: If you have big holes where the increases are, these areas will be covered by the nose. You can also use the tail end of the beginning slip knot to sew them closed.
Rnd 2: Ch1, 1 hdc in the same st.
6 hdc until the ch1 sp.
(2 sc, ch1, 2 sc) all in the same ch sp. (Corner 1).
NOTE: Don’t forget to replace the st marker in the ch1 sp for each corner.
2 sc until the next ch sp.
(2 sc, ch1, 2 sc) all in the same ch sp. (Corner 2).
9 hdc until the next corner.
(2 sc, ch1, 2 sc) all in the same ch sp. (Corner 3).
2 sc until the next ch sp.
(2 sc, ch1, 2 sc) all in the same ch sp. (Corner 4).
Hdc in the last 2 sts.
Sk the sl st and the ch1. Sl st on top of the first sc. (38 sts).
Rnd 3: Ch2.
Starting in the next st, 6 dc, 2 hdc until the ch 1 sp.
(sc, ch1, sc) all in the same ch sp. (Corner 1).
6 sc until the next ch sp.
(sc, ch1, sc) all in the same ch sp. (Corner 2).
2 hdc, 11 dc until the next corner.
(2 sc, ch1, 2 sc) all in the same ch sp. (Corner 3).
6 sc each until the next ch sp.
(2 sc, ch1, 2 sc) all in the same ch sp. (Corner 4).
Dc in the last 4 sts.
Sl st on top of the first st. (49 sts).
Rnd 4: Ch2, 1 dc in the same st.
7 dc, 1 hdc in the next st.
(sc, ch1, sc) all in the same ch sp. (Corner 1).
8 sc each until the next ch sp.
(sc, ch1, sc) all in the same ch sp. (Corner 2).
hdc, 15 dc until the next corner.
(sc, ch1, sc) all in the same ch sp. (Corner 3).
10 sc until the next ch sp.
(sc, ch1, sc) all in the same ch sp. (Corner 4).
Dc in the last 6 sts.
Sl st on top of the first st. (57 sts).
Rnd 5: Ch1, sc in the same st as the ch1. In the blo, sc in each st including the ch1 spaces. Sk the sl st and the ch1 at the end. Sl st on top of the first sc. (61 sts).
NOTE: Here is a video tutorial if you’ve never crocheted in the back loop only:
You can see the edge forming from the back loop sts.

This is the hook in the back loop only.

Rnd 6: Ch1, starting in the same st, 61 sc. Sk the sl st and the ch1 at the end. Do not ch1. (61 sts).
NOTE: Rounds 7-10 will be done in continuous rounds.
Rnd 7-10: 61 sc. (61 sts).
Rnd 11: In the blo, 10 sc, dec, 9 sc, dec, 17 sc, dec, 10 sc, dec, 7 sc. (57 sts).
After this row in the blo, it will create a box shape as you continue.

Rnd 12: 8 sc, (dec) x 3, 5 sc, (dec) x 2, 12 sc, (dec) x 3, 7 sc, (dec) x 3, 3 sc. (46 sts).
Rnd 13: 7 sc, (dec) x 3, 2 sc, (dec) x 2, 10 sc, (dec) x 3, 3 sc, (dec) x 3, 2 sc. (35 sts).
Rnd 14: 4 sc, (dec) x 3, sc, (dec) x 2, 6 sc, (dec) x 3, sc, (dec) x 3, sc. (24 sts).
Fill with polyfil before the opening gets too small. Stuff lightly so you don’t lose the box shape.
Rnd 15: (dec) x 12. (12 sts).
Rnd 16: (sc, dec) x 4. (8 sts).
Rnd 17: (dec) x 4. (4 sts).
Fasten off. Close the hole by sewing through the front loop of all 4 sts and pulling it tight to close.
Here is a video tutorial showing how:
NOSE: 3.25 mm hook, brown yarn, st marker.
Rnd 1: MR, 6 sc. (6 sts).
Rnd 2: (inc) x 6. (12 sts).
Rnd 3: (sc, inc) x 6. (18 sts).
Rnd 4: (inc, 2 sc) x 6. (24 sts).
Rnd 5: Sl st to the next st. Ch1. In the blo, 24 sc. (24 sts).
Rnd 6: Sl st to the next st. Ch1, 24 sc. (24 sts).
Sl st to the next st. Fasten off with a very long tail to sew the nose onto the head.
Line it up about 4 rows down from the top of the head, 3 rows up from the bottom. 1 to 1.5 rows in from the sides of the face.

Sew through each st on the nose, but stop before completely closing it so you can add polyfil inside.
Use the seamless join technique for a clean look. Weave in the end.
Here is a video showing how:

FACE: Black yarn, yarn needle.
Cut a really long piece of black yarn to do the eyebrows, eyes and mouth all in one go if possible.
If you’ve never embroidered onto a closed object, here is a video showing how:
Eyebrows:
Start at the edge of the face at the top, there should be 3 sts between the eyebrows.

Come up from there for the left eyebrow.
Go in one st to the left.

Come up 2 rows down from where you started, and lined up with the side of the nose.
Go back in where the eyebrow ends at the top.

Come back up where the middle curve of the eyebrow would be.

Bring the yarn up over the middle of the eyebrow, then back in where you just came out from.


Repeat for the opposite eyebrow, 3 sts between where they start.


Eyes:
Start 2 rows down from the top edge of the face.
The top point of the eyes line up close to the beginning edge of the eyebrows at the top.

They should have about 3 sts of space between the eyes.
Keep stitching the height of about 2 rows, as well as shorter sts halfway down the eyes to make the oval shape.


Keep going over this space until the eyes are filled in with no beige yarn showing.
Repeat for the other eye.

Mouth: (He looks cute without the mouth too!).
Starting with it lined up to the right side of the nose and lined up with the bottom of the nose, come up.

Go back in the opposite side, lined up the same way with the bottom and side of the nose.

Come up 2 rows down in the middle of the mouth and stitch it in place like you did the eyebrows for the curve.


Come up 1 row from the left side of the mouth.

Go back in 3 rows down and slightly to the right.

St the curve down like you did with the eyebrows and the smile.


ASSEMBLE:
Using the yellow tail from the beginning of making the blanket body, sew the head into the center of the blanket. Remember to really overdo it with the knots and weaving in if a baby will be pulling on this.
Weave in all ends.


ALL DONE!
Remember not to leave your Blanky behind!

I hope you enjoyed making him as much as I did!
Check out my other patterns in my Etsy shop HERE 🙂
More FREE patterns HERE
If you liked this pattern, please support me on Ko-Fi!
Please tag me if you share your creation on social media so I can share yours on my page! 🙂
Instagram
Facebook
Twitter
TikTok
Subscribe for FREE
patterns & Updates!
Tags: amigurumi, amigurumi dolls, baby and kids, blanky, crochet, crochet lovey, crochet pattern, free pattern, how to crochet, the brave little toaster
 Subscribe for a FREE baby set pattern & updates! (All the cool kids are doing it.)
About how much yarn does this use, more specifically the yellow?
Hello! Thanks for asking, I hadn’t realized I left that info out! I used about 150 yds of yellow. The rest of the colors use very very little yarn